Are you using web forms (formerly called an "Echo") effectively? A web form is one of LeadDolphin's top lead collection/prospecting tools. Every one of your trainers and sales reps should be posting these on Facebook, Twitter and other social media channels. When posting the web form it is important to be sure and ask people to share them with their friends. Effectively posting these weekly/daily will generate leads into your LeadDolphin account and create more clients and members for your club!
To access web forms, access it from the menu item Webforms.

1. Create Your Echo
- Click Create a Webform button at the top of the page.

- Enter a title for your web form
- Check Kiosk Mode (ideal for sharing in social media)
-
Add Image
- To add an image, click on the image icon in the toolbar

- Click on Browse Server on the next dialog box

- Click Upload, and from here it should be simple to select your image and upload it to the server

- To add an image, click on the image icon in the toolbar
- Save your newly created web form
2. Add fields to your web form
At this point you need to add the fields that you want to collect from your web form. Click the Webform tab, then click the Form components tab below it. Enter the following standard fields in the locations noted in the screenshot:
- First Name (see screenshot below for this first field as an example)
- type: textfield (nearly all your fields will be "textfield" save for the "email" field)
- required (meaning the field needs to be filled out before the person can submit their information)
-
Click Add button on the right to advance to the settings page for this field
- On the settings page following your click on "Add," you can accept all the defaults on that page and not change anything. Just click "Save" on this page.
- Go back to step one and add more fields (like Last Name, Email, and Phone)
- Once you've added all the fields you want, click Save (#5 in screenshot below) and this saves your work entering fields web form.

3. Map fields from your web form to the database
While it may seem obvious to us how these fields are supposed to work, the server needs it spelled out and we have to "map" the fields you created to the names of the database fields in the system. It's an easy process--while in the Webform tab, select the sub-tab of Lead Map. Then just select the most relevant field in the drop down to the right of each of your newly entered fields.
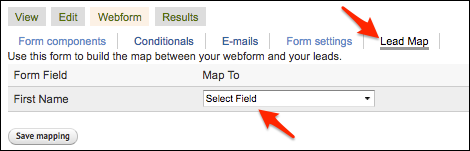
- First Name select- (Name->Given)
- Last Name Select- (Name->Family)
- Email Select- (Email)
- Phone Select- (Cell Phone->Number)
Then click Save Mapping at the bottom.
4. Final step

